Introduction
![]()
The SQL Migration Tool is a cross-platform desktop application that helps developers and teams manage database schema changes in a controlled, auditable, and repeatable manner.
Features
- Pure SQL migrations - Migrations are represented as
.sqlfiles, allowing pure SQL scripts for both applying and rolling back changes. These can be executed by this tool or by your database management software of choice. - Easy integration - Easily add to any project. Whether you’re running legacy code or have an existing database migration system, this tool can be integrated into your project to manage database changes without any issues.
- Multiple environments - Use one project to deploy to multiple environments such as staging and production.
- Dynamic replacements - Perform string replacements in SQL files based on the selected environment, allowing you to target different tables or columns, or insert different data depending on the environment.
- Flexible credential sources - Avoid storing credentials in code. Retrieve credentials from
.envfiles or AWS Secrets Manager. - Scripts support - Run various SQL scripts as
.sqlfiles with dynamic replacements applied. - CI/CD ready - Deploy changes in any Node.js-supporting CI/CD pipeline using the 2am-smt CLI tool.
- Multi-project support - Multiple SQL migration projects can track their migrations on a single database, each separated by its own unique identifier.
Supported Databases
- MySQL / MariaDB
- PostgreSQL
- MS SQL Server
Creating a New Project
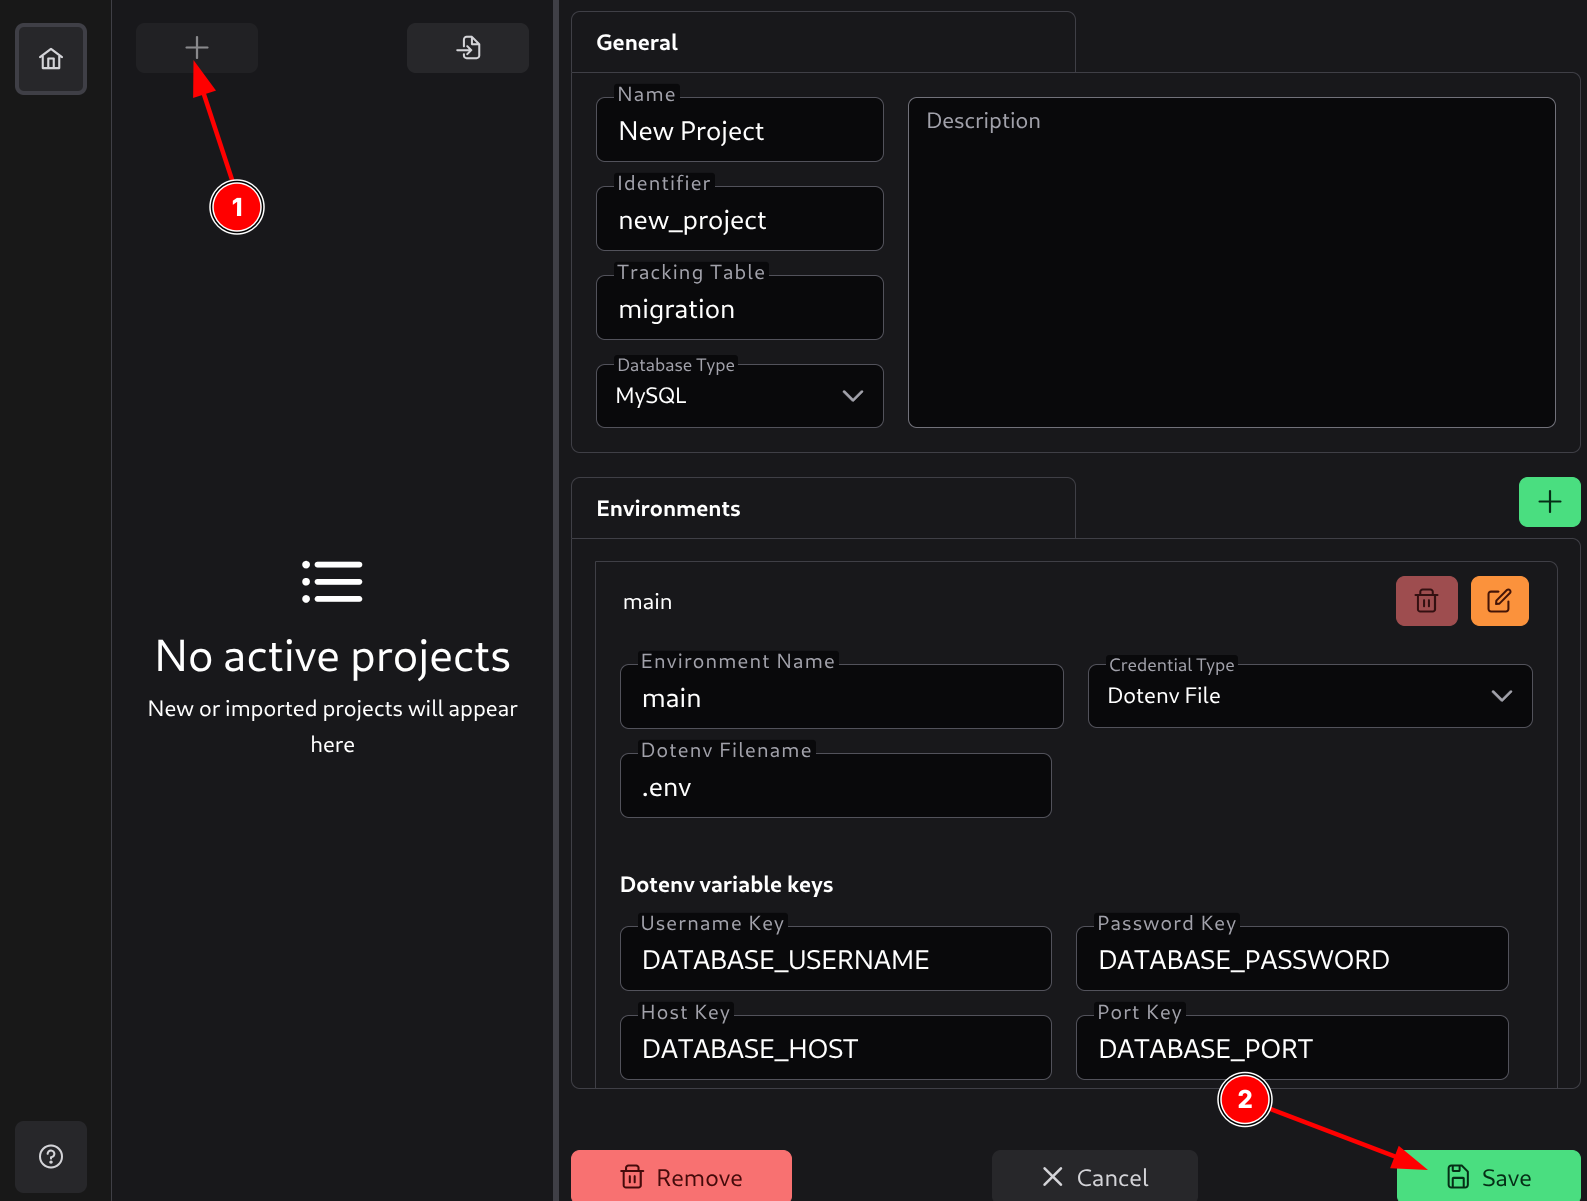
To create a new project, click on the plus sign (1). This will display a form where you can enter the project details.
The General section contains the basic metadata needed to set up a new project.
- Name - Human-readable name of the project.
- Identifier - A unique slug/key used internally to reference the project. Common pattern: lowercase with hyphens, no spaces (e.g.,
my-awesome-project). This identifier will be used in the database to track migrations for this project. - Tracking Table - Name of the table where SQL Migration Tool will track which migrations have been applied.
- Database Type - Choose the database engine your project will use. SQL Migration Tool currently supports MySQL, PostgreSQL, and Microsoft SQL Server.
- Description - Optional text describing the purpose of this project. Use this field to briefly outline the system or migration tasks the project handles.
Environments
Each project can have one or more environments (e.g., local, development, staging, production).
An environment defines how SQL Migration Tool connects to your database.
Each environment has a name and a credential type:
- Environment name - A human-readable identifier for the environment.
- Credential type - Defines how the application will retrieve the database connection details.
Fields in the environments depend on the chosen credential type.
Direct Credentials
Direct credentials means you enter the database connection details directly into the application. These credentials (also called hardcoded credentials) will be committed to the configuration file. It is not recommended to use this method for production environments.
Fields:
- Username - Database username.
- Password - Database password.
- Host - Database host address.
- Database Name - Name of the database to connect to.
- Port - Database port.
- Use SSL - Whether to use an SSL connection to the database.
- CA File Path - Path to the SSL CA file, if applicable.
- Certificate File Path - Path to the SSL certificate file, if applicable.
- Key File Path - Path to the SSL key file, if applicable.
- Verify Peer Certificate - Whether to verify the peer certificate.
AWS Credentials
AWS credentials means the application will retrieve database connection details from AWS Secrets Manager. This is a secure way to store and retrieve database credentials.
Fields:
- Path - The full path to the secret in AWS Secrets Manager.
- Region - The AWS region where the secret is stored.
- Secret keys - Mapping of secret keys to database connection fields. You can specify which key in the secret corresponds to which database field (host, port, database name, username, password).
- Username Key - Key in the secret that contains the database username.
- Password Key - Key in the secret that contains the database password.
- Host Key - Key in the secret that contains the database host.
- Database Name Key - Key in the secret that contains the database name.
- Port Key - Key in the secret that contains the database port.
- Use SSL - Whether to use an SSL connection to the database.
- CA File Path - Path to the SSL CA file, if applicable.
- Certificate File Path - Path to the SSL certificate file, if applicable.
- Key File Path - Path to the SSL key file, if applicable.
- Verify Peer Certificate - Whether to verify the peer certificate.
Dotenv Credentials
Dotenv credentials means the application will retrieve database connection details from a .env file. This is a secure way to store and retrieve database credentials without hardcoding them into the configuration file, as this file is usually excluded from version control.
Fields:
- Dotenv File Name - Name of the
.envfile (e.g.,.env,.env.production). - Dotenv variable keys - Mapping of dotenv variable keys to database connection fields. You can specify which variable in the
.envfile corresponds to which database field (host, port, database name, username, password).- Username Variable Key - Variable in the
.envfile that contains the database username. - Password Variable Key - Variable in the
.envfile that contains the database password. - Host Variable Key - Variable in the
.envfile that contains the database host. - Database Name Variable Key - Variable in the
.envfile that contains the database name. - Port Variable Key - Variable in the
.envfile that contains the database port. - Use SSL Variable Key - Variable in the
.envfile that indicates whether to use an SSL connection to the database. Valuestrue,yes,on, and1are considered true. - SSL CA File Path Variable Key - Variable in the
.envfile that contains the path to the SSL CA file. - SSL Certificate File Path Variable Key - Variable in the
.envfile that contains the path to the SSL certificate file. - SSL Key File Path Variable Key - Variable in the
.envfile that contains the path to the SSL key file. - SSL Verify Peer Certificate Variable Key - Variable in the
.envfile that indicates whether to verify the peer certificate. Valuestrue,yes,on, and1are considered true.
- Username Variable Key - Variable in the
Saving a Project
Once you click the Save button (2), a dialog will open where you can choose the location to save the project’s configuration.yml file. This file is the entry point to your project and will be used to reference these settings.
At the time of creation, SQL Migration Tool will create the following structure:
.
├── configuration.yml - Project configuration file
├── README.md - Project README file
├── .gitignore - Git ignore file to ignore files from version control
├── migrations - Migrations folder
│   ├── down - Down migrations folder
│   │   ├── .gitkeep - Placeholder file to keep the folder in version control
│   └── up - Up migrations folder
│       ├── .gitkeep - Placeholder file to keep the folder in version control
├── package.json - Node.js package file, used by CLI tool and in CI/CD
└── scripts - Scripts folder
    └── .gitkeep - Placeholder file to keep the folder in version control
If one of the environments has dotenv credentials, additional .env example files will be created.
Managing Projects
Importing Existing Projects
Existing projects can be added to SQL Migration Tool by clicking the import button.
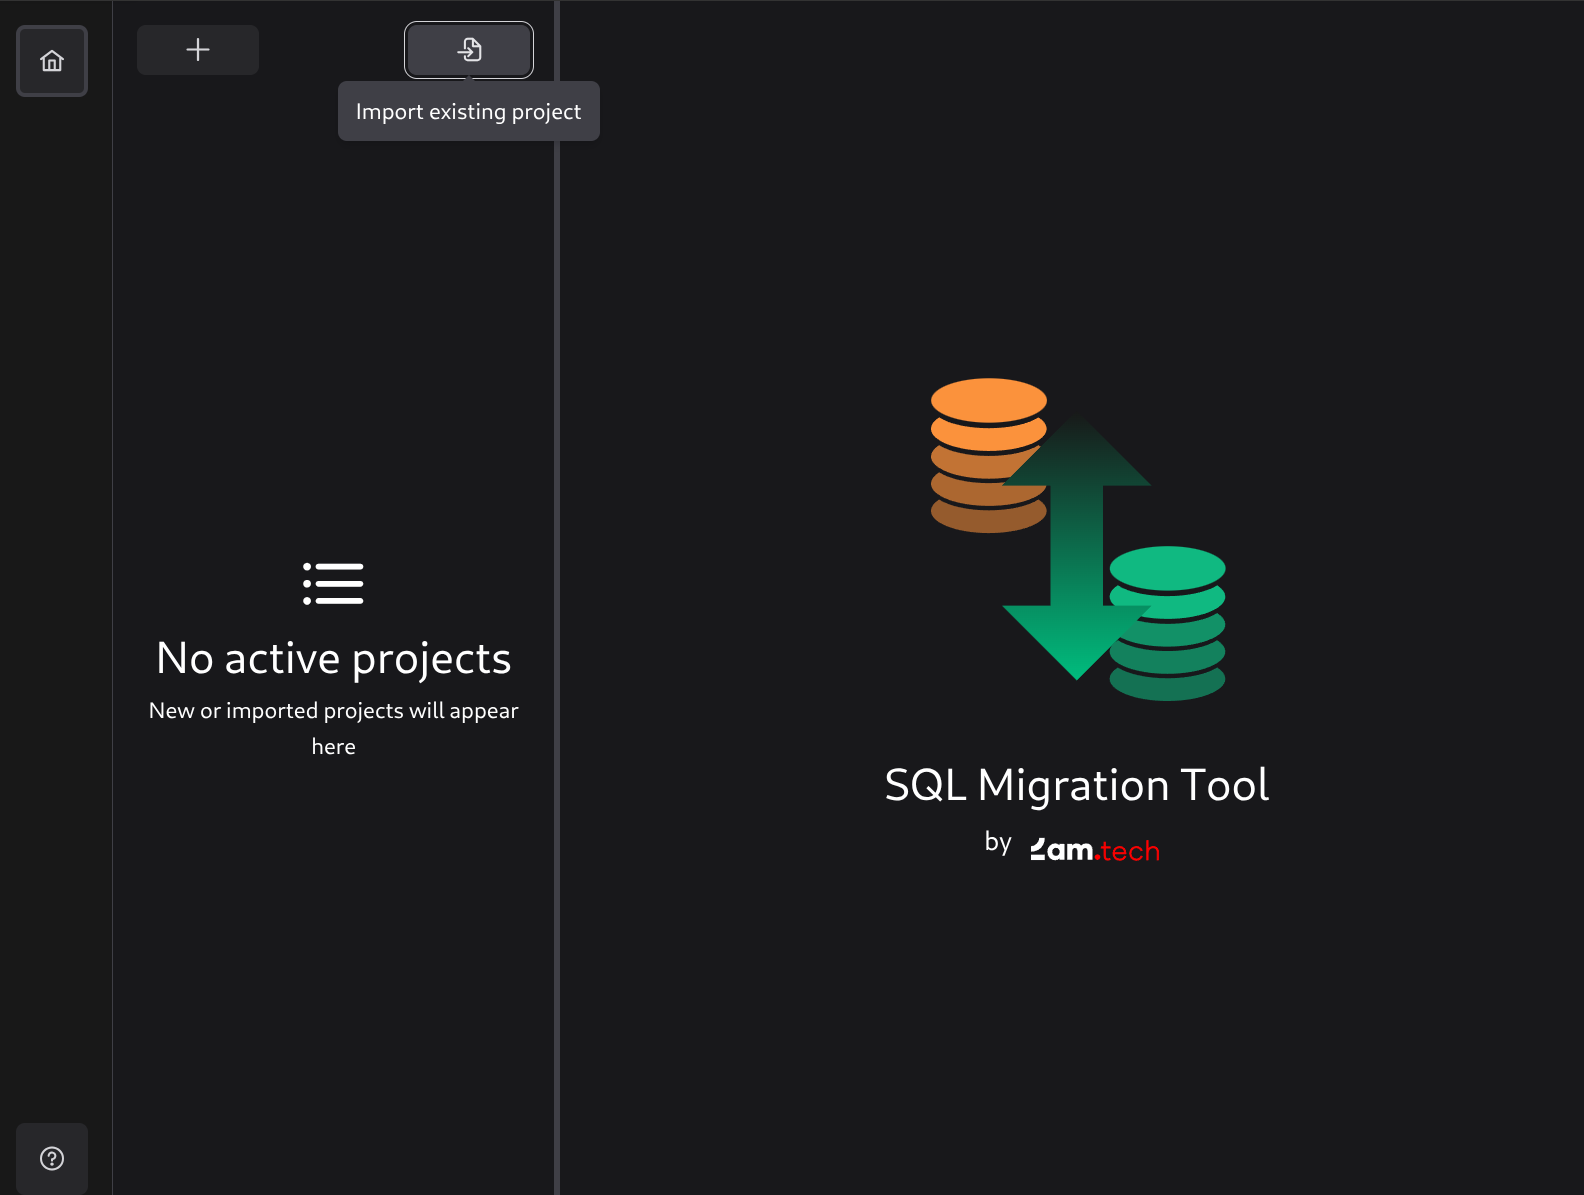
This will open a dialog where you can select a configuration.yml file, which will add the project to the list of projects in SQL Migration Tool.
Managing a Project
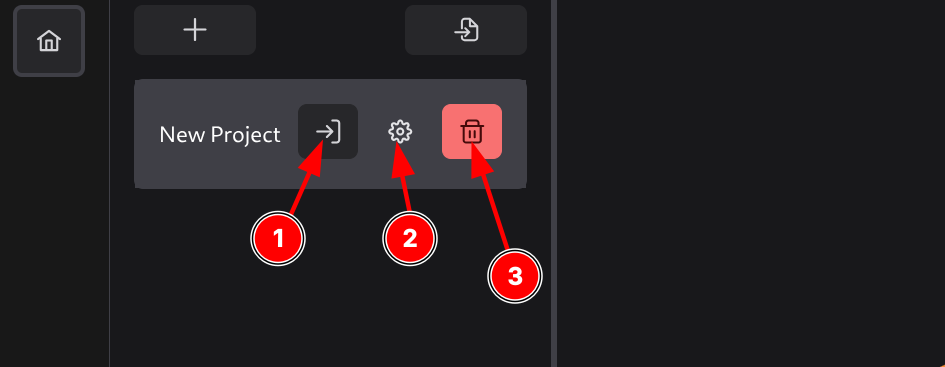
Every project added to the list will have 3 buttons:
- Open the project - Opens the project for editing migrations.
- Settings - Opens project settings to manage project details like drivers, environments, etc.
- Delete a project - Removes the project from the list (but not from the hard drive).
Editing Settings
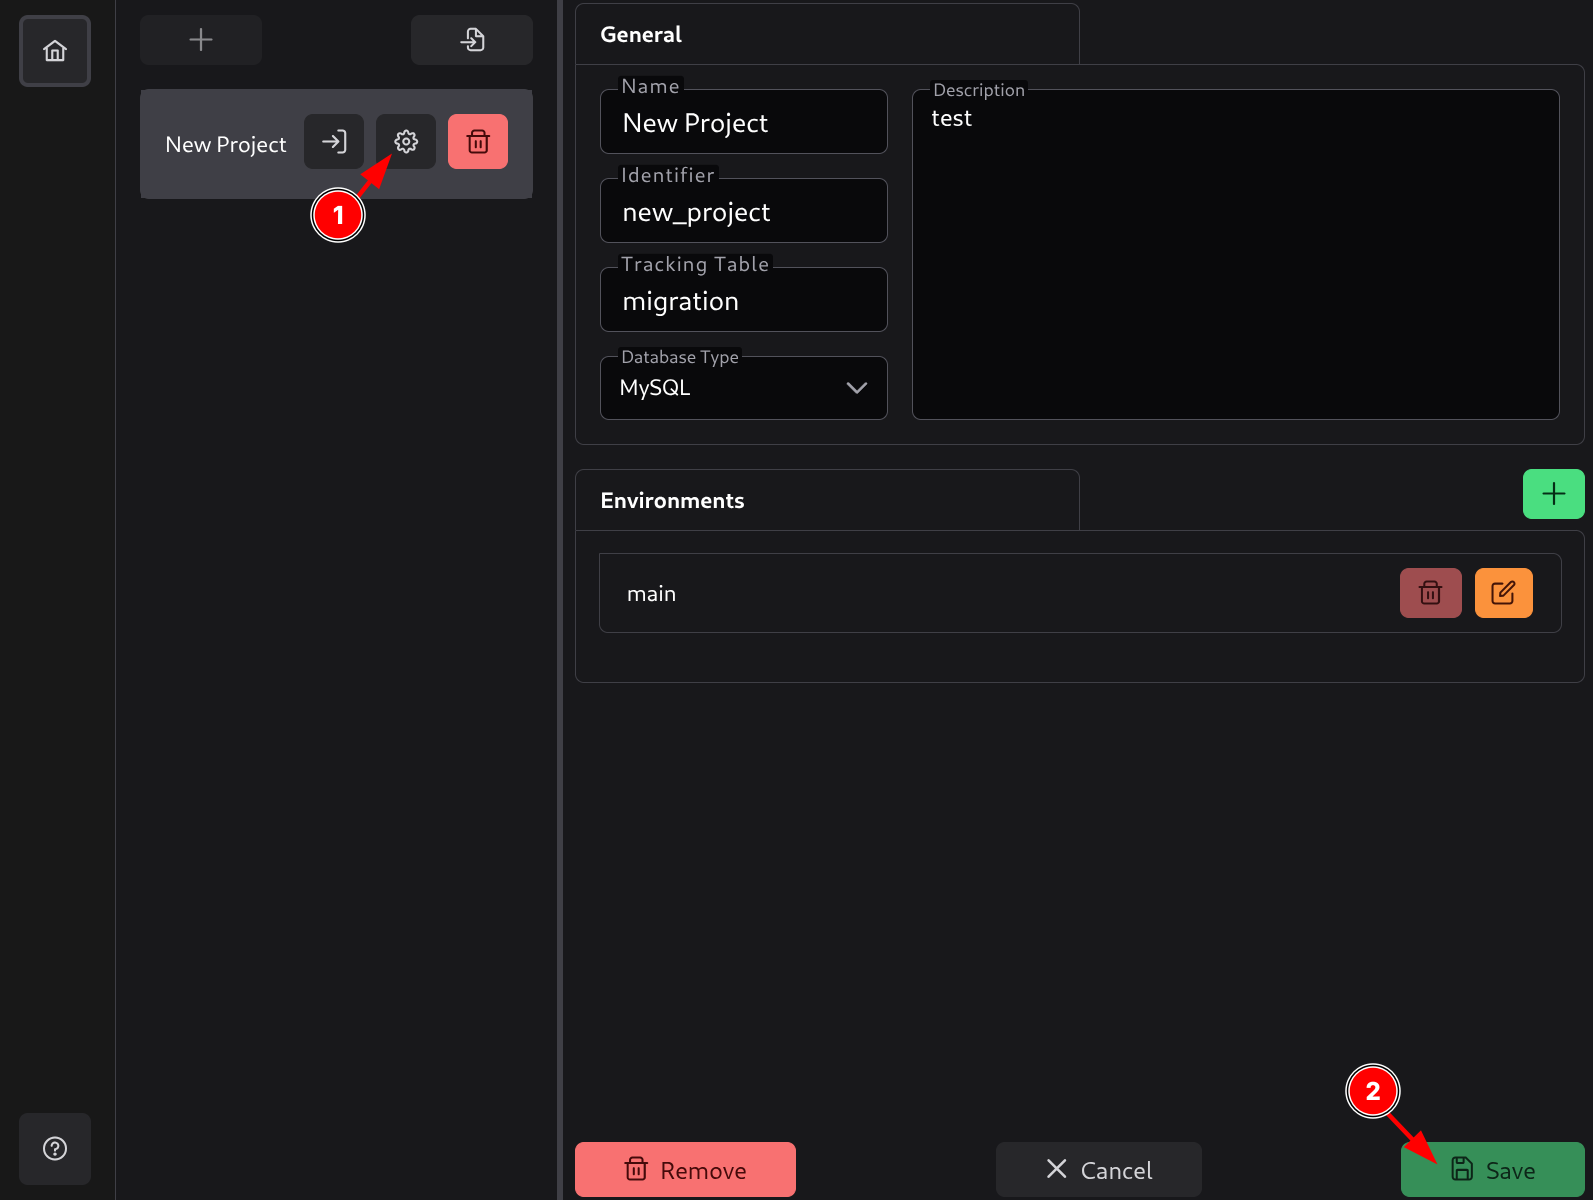
You can click on project settings (1) to display them on the right side and edit them. After making changes, you can click Save (2) or press Ctrl+S to save them.
Note: A project’s settings cannot be edited while the project is open. You will need to close the project first.
Creating Migrations
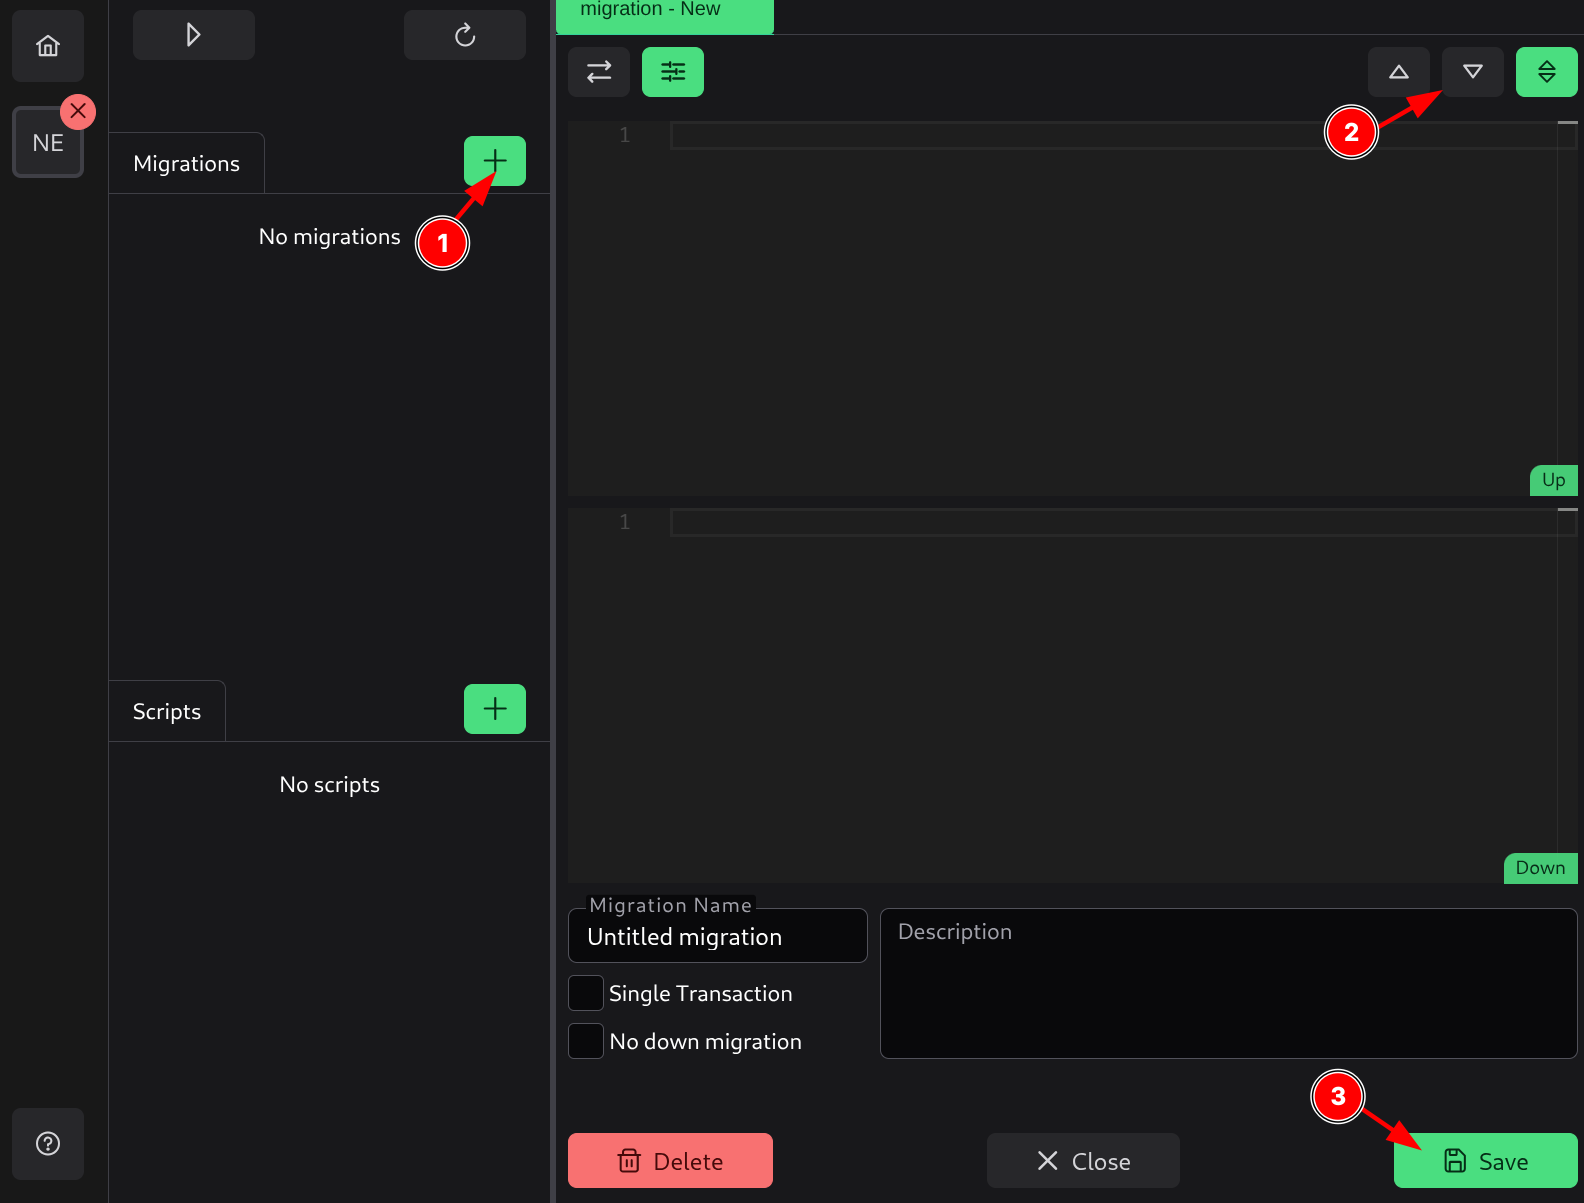
To create a migration, click the plus button (1), which will open a new migration tab. This migration tab will show two editors by default:
- Up editor - Where you edit an Up migration.
- Down editor - Where you edit a Down migration.
In the top right, you can change the editor view (2) to switch view modes and see only Up, Down, or both migrations.
Every migration file has settings you can configure:
- Name - Name of the migration.
- Description - Description of the migration.
- Single Transaction - Whether to run the migration in a single transaction.
- No down migration - Whether this migration has no down migration. This will disable the down views.
You can also add dynamic replacements for this migration.
Once a migration is ready to be saved, you can save it by pressing the Save button (3) or pressing Ctrl+S. This will save it in the project and add it to the list.
Creating Scripts
Scripts allow you to run common SQL code snippets against your databases. These can be routine maintenance tasks that you want to keep in the project.
Scripts also support dynamic replacements.
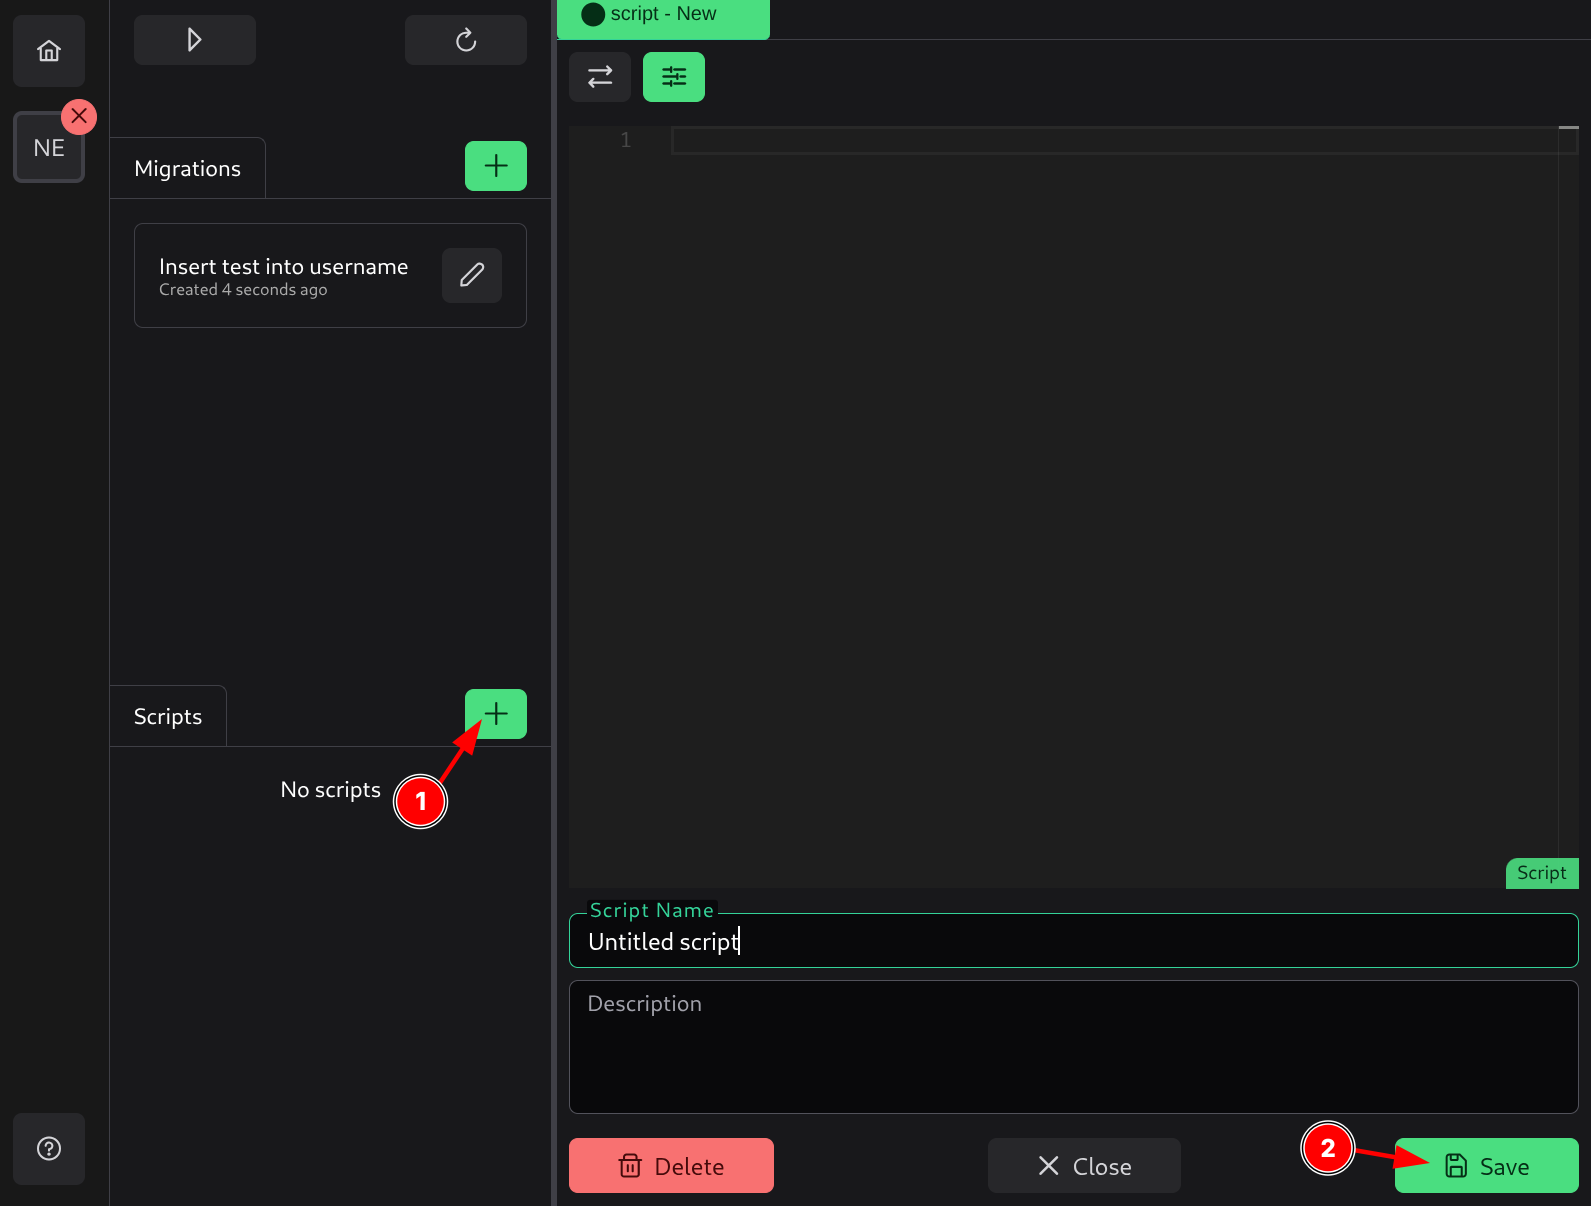
To create a new script, click the plus button (1) and enter your SQL code. Add a name and description to your script, then click Save or press Ctrl+S.
Dynamic Replacements
SQL Migration Tool supports dynamic replacements in migration files. You can use text placeholders in your SQL scripts that will be replaced with actual values at runtime.
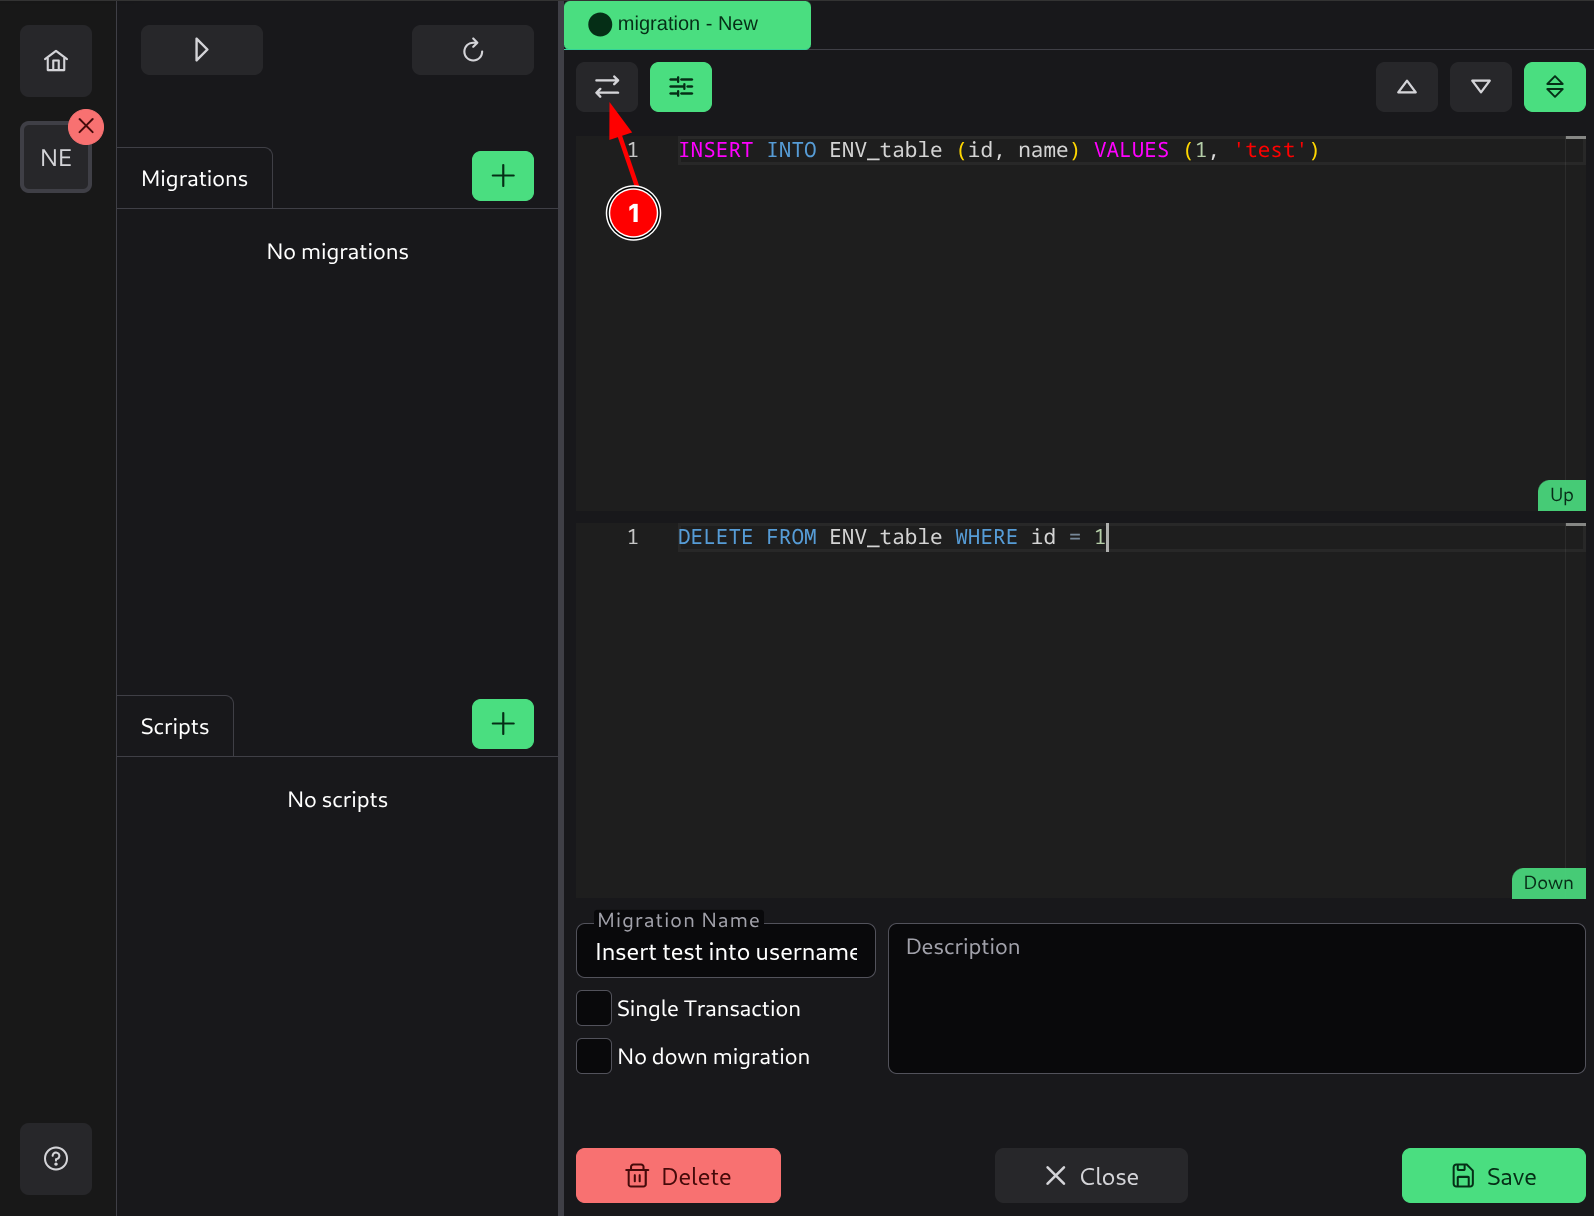
When replacements are opened, the editor for this migration goes into read-only mode, and you can add one or more replacements per environment.
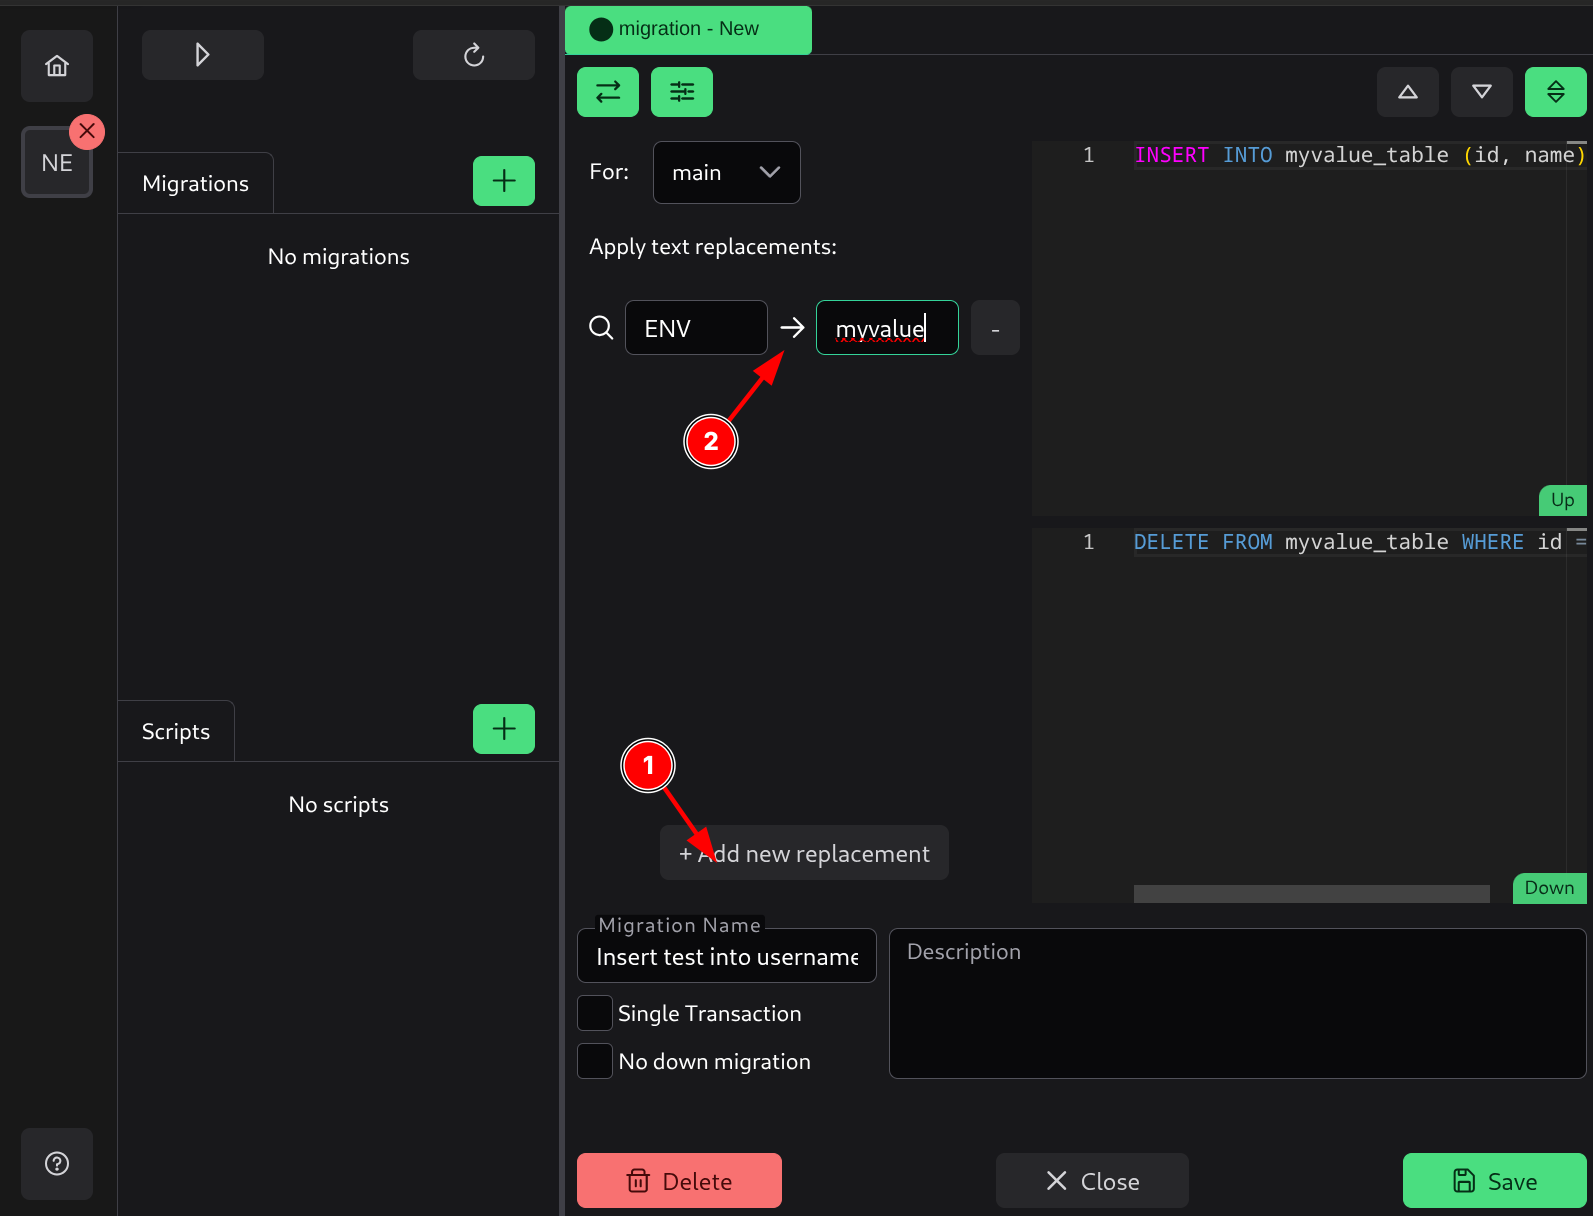
Any value specified in the From field will be replaced in the query with the value in the To field when this migration is deployed to the specific environment.
These replacements make it possible to:
- Customize SQL per environment
- Avoid hard-coded values inside migrations/scripts
- Inject paths, database names, or feature flags dynamically
- Keep production-safe values out of development environments
Dynamic replacements are available in both migrations and scripts.
Connecting to the Database
In order to run migrations or scripts on your database from the application, you first need to connect to it.
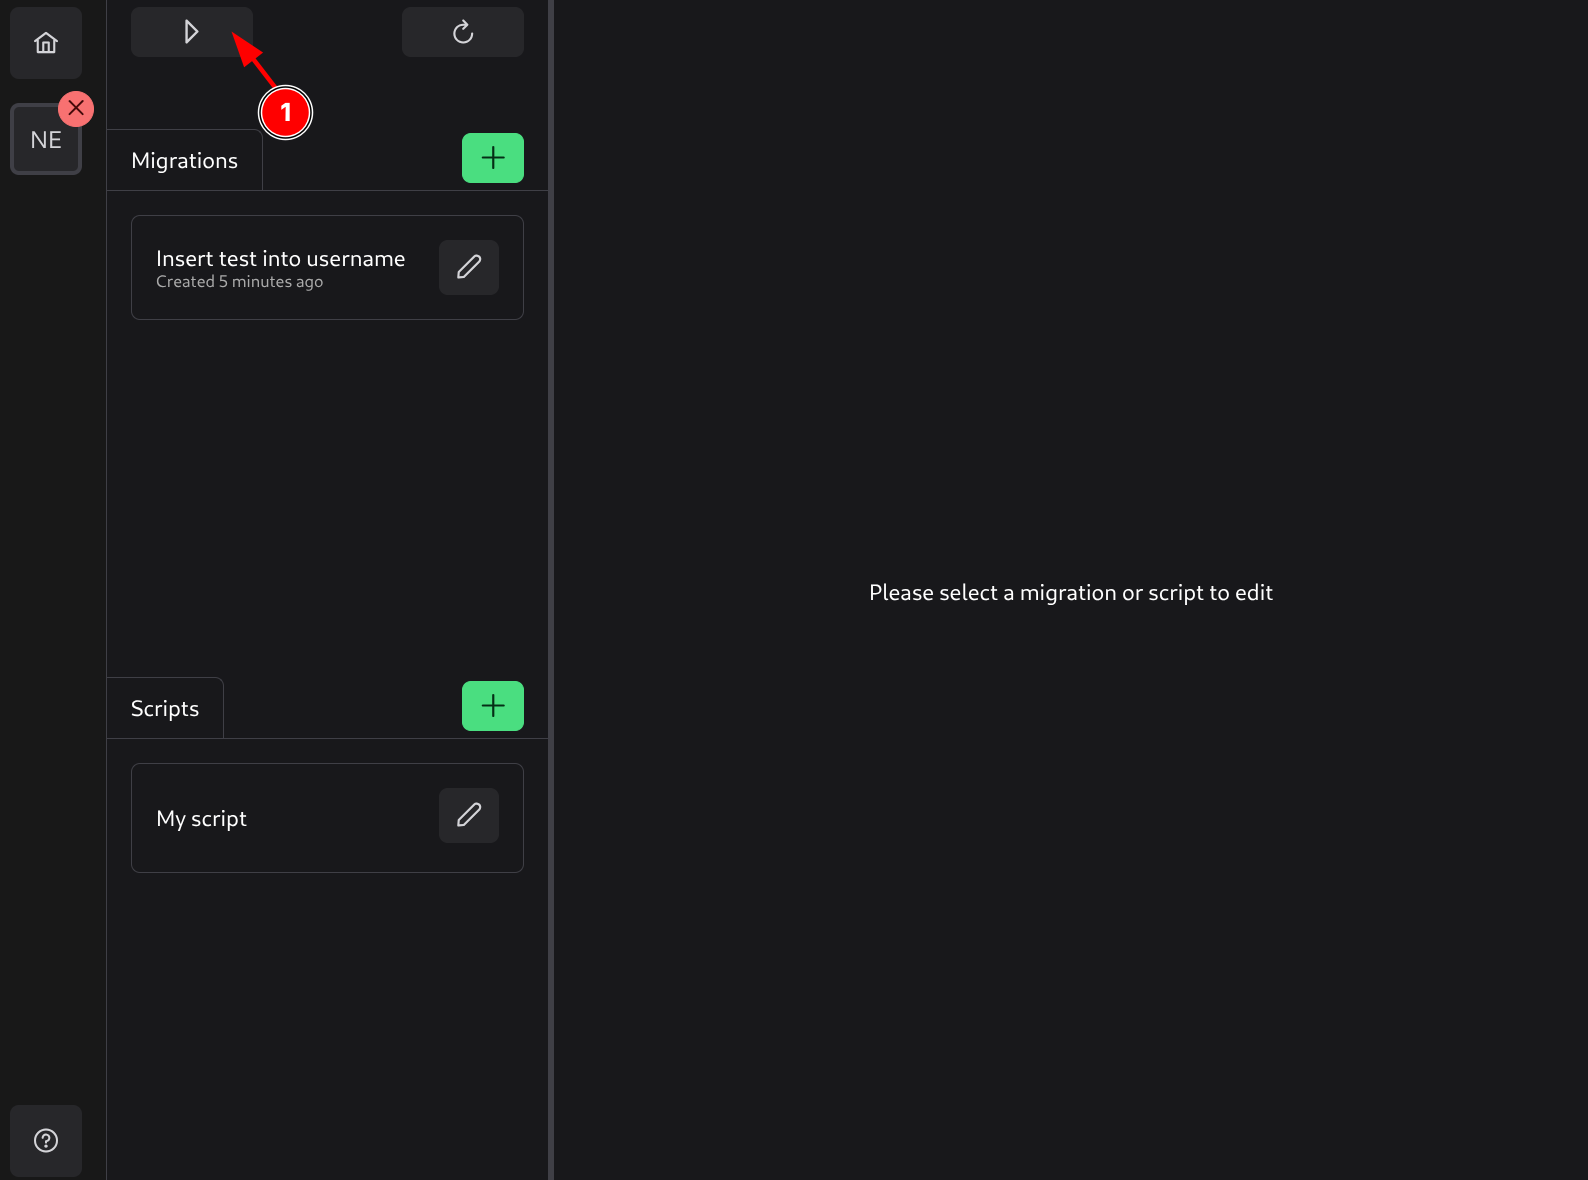
To connect, switch the project into Run mode (1).
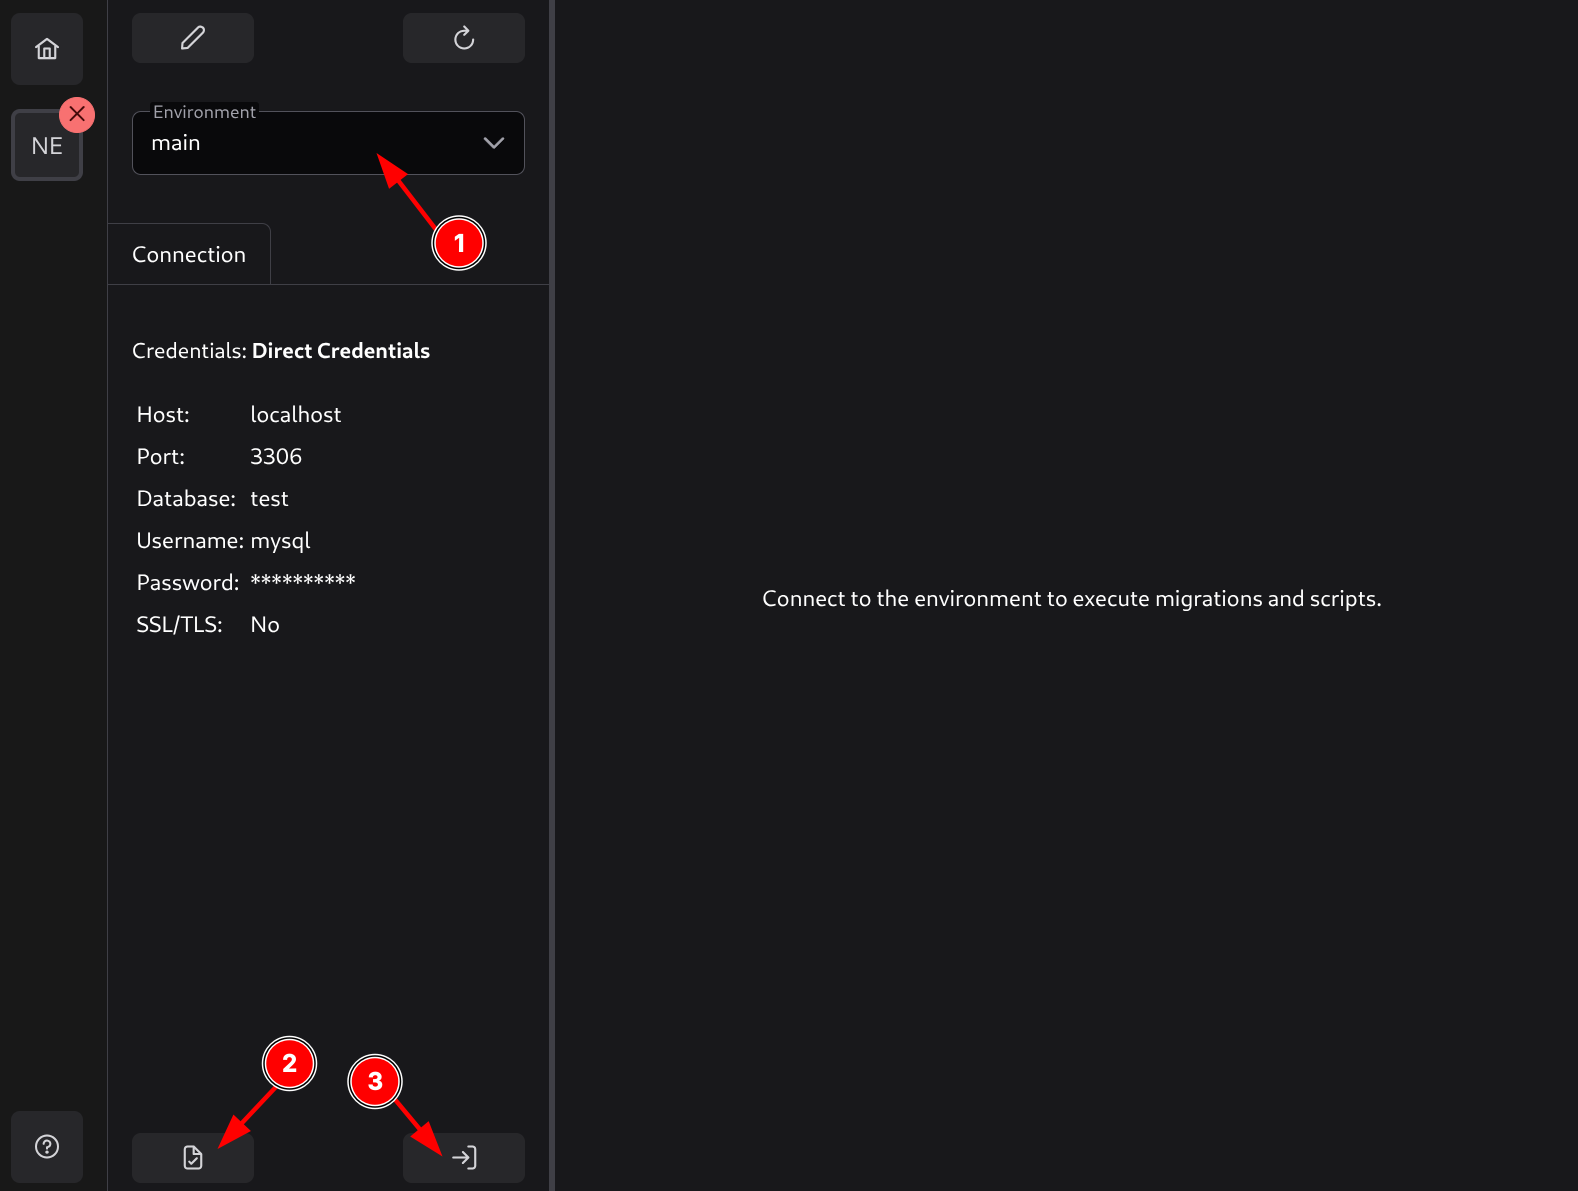
In Run mode, first select the environment to connect to (1). Depending on the chosen environment, you may need to enter additional data:
Direct Credentials
No additional data is needed.
AWS Credentials
The following additional data will be needed:
- AWS Access Key ID - Your AWS access key ID.
- AWS Secret Access Key - Your AWS secret access key.
These access keys will be stored in SQL Migration Tool’s config file (not in the project) so they can be reused for future connections. This ensures that these credentials are not committed with the project.
Dotenv Credentials
The following additional data will be needed:
- Dotenv folder path - Path to the folder where the dotenv file (with the name specified in dotenv credentials) is located.
This configuration will be stored in SQL Migration Tool’s own config file (not in the project).
After entering the correct connection data, you can click the Test button (2) to try connecting to the database with these credentials, or you can connect directly by pressing the Connect button (3).
Disconnecting
To disconnect from the database, click the Disconnect button (1).
Running Migrations
How Migrations Are Applied
In SQL Migration Tool, migrations are grouped into projects. Each project has its own set of up and down migrations. When a user connects to the database and runs these migrations, the tool checks if the tracking table named in the project settings exists in the database. If not, it creates it. Then it checks the list of up migrations in the project against the rows in the database. Missing rows indicate that those migrations have not been applied.
This approach allows multiple users to write their own migrations and commit them to version control. The final destination will combine all those migrations in the proper order so they can be applied to the database.
Every added migration can also be reverted, provided the file is not marked as irreversible. Reverting a migration runs the file with the same name from the down migrations folder and removes the row from the tracking table.
Applying migrations
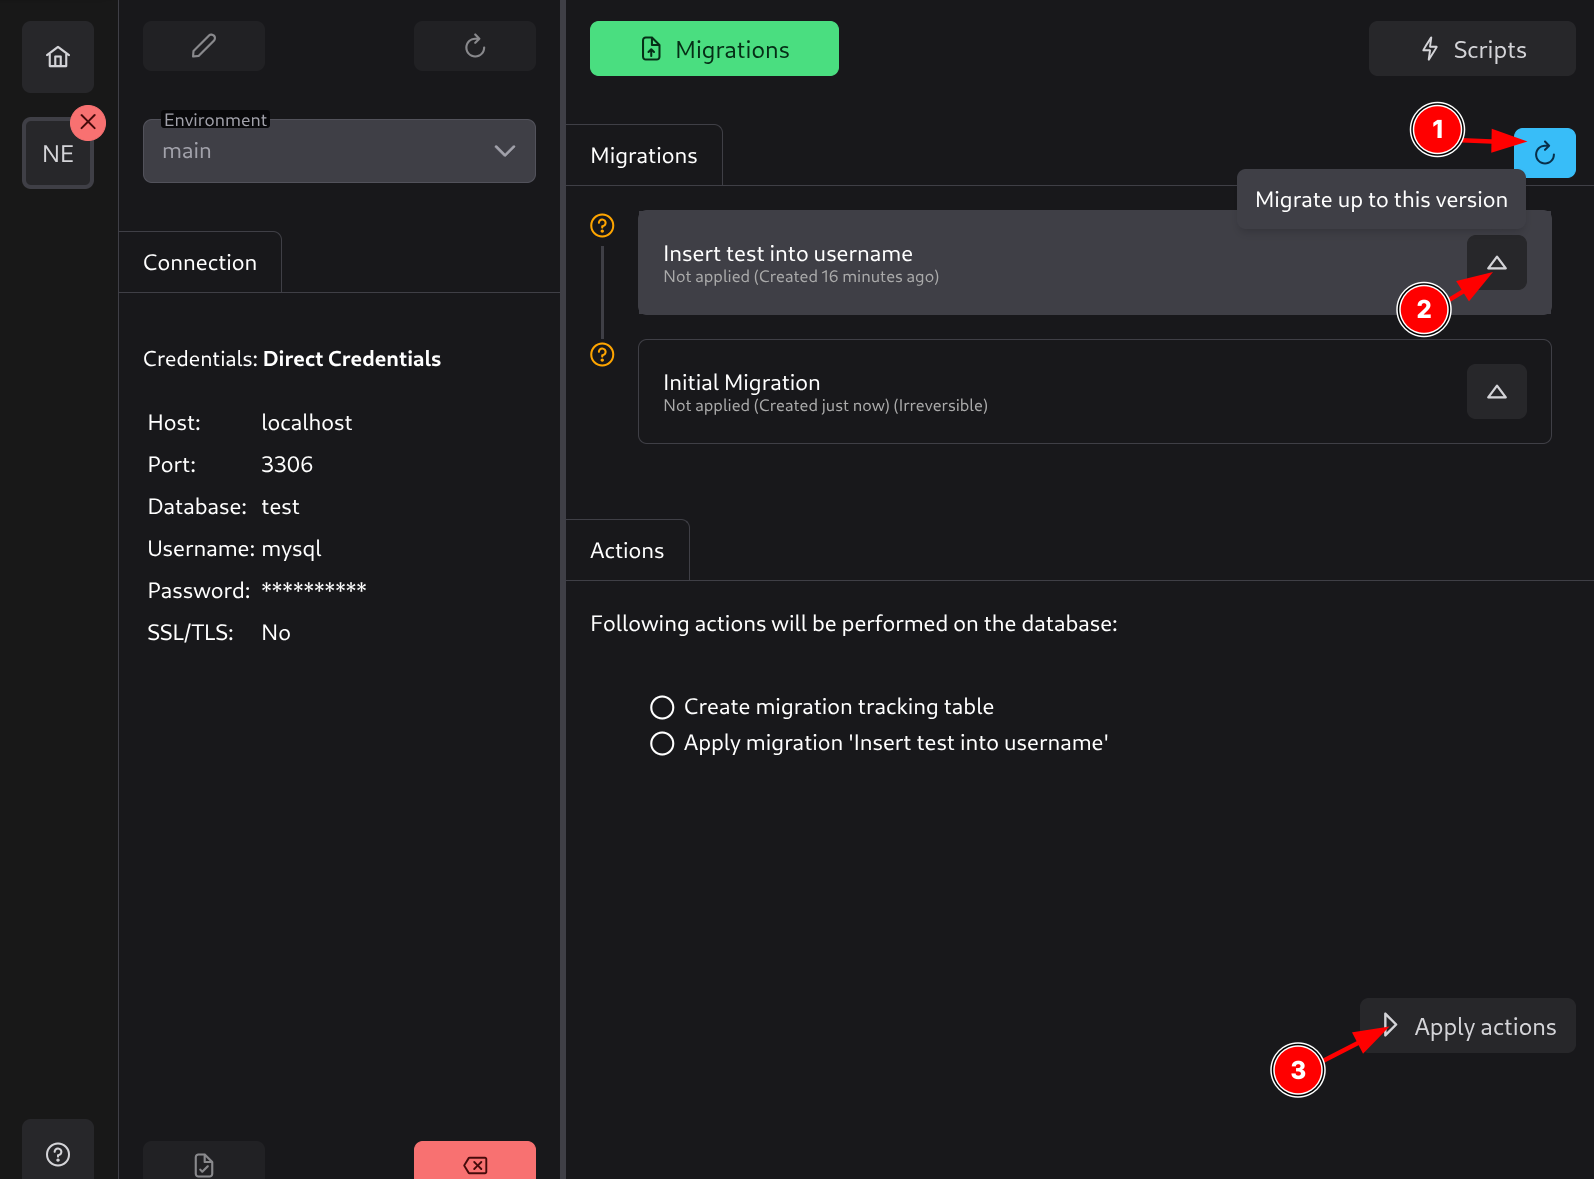
Once connected, you will see a list of migrations. Migrations are shown in descending order with the newest one at the top.
Next to each migration, an icon will indicate whether the migration has not yet been applied (question mark) or has been applied (green checkmark).
You can click Refresh (1) to reload the state from the database and refresh the list.
You can click on the desired migration to apply all migrations from the last applied state in the database up to that migration (2).
Once you click on an unapplied migration, the actions will be shown below. In this case, since we do not have a tracking table created, it will also show that action.
To perform those actions, click Apply Actions (3).
Reverting Migrations
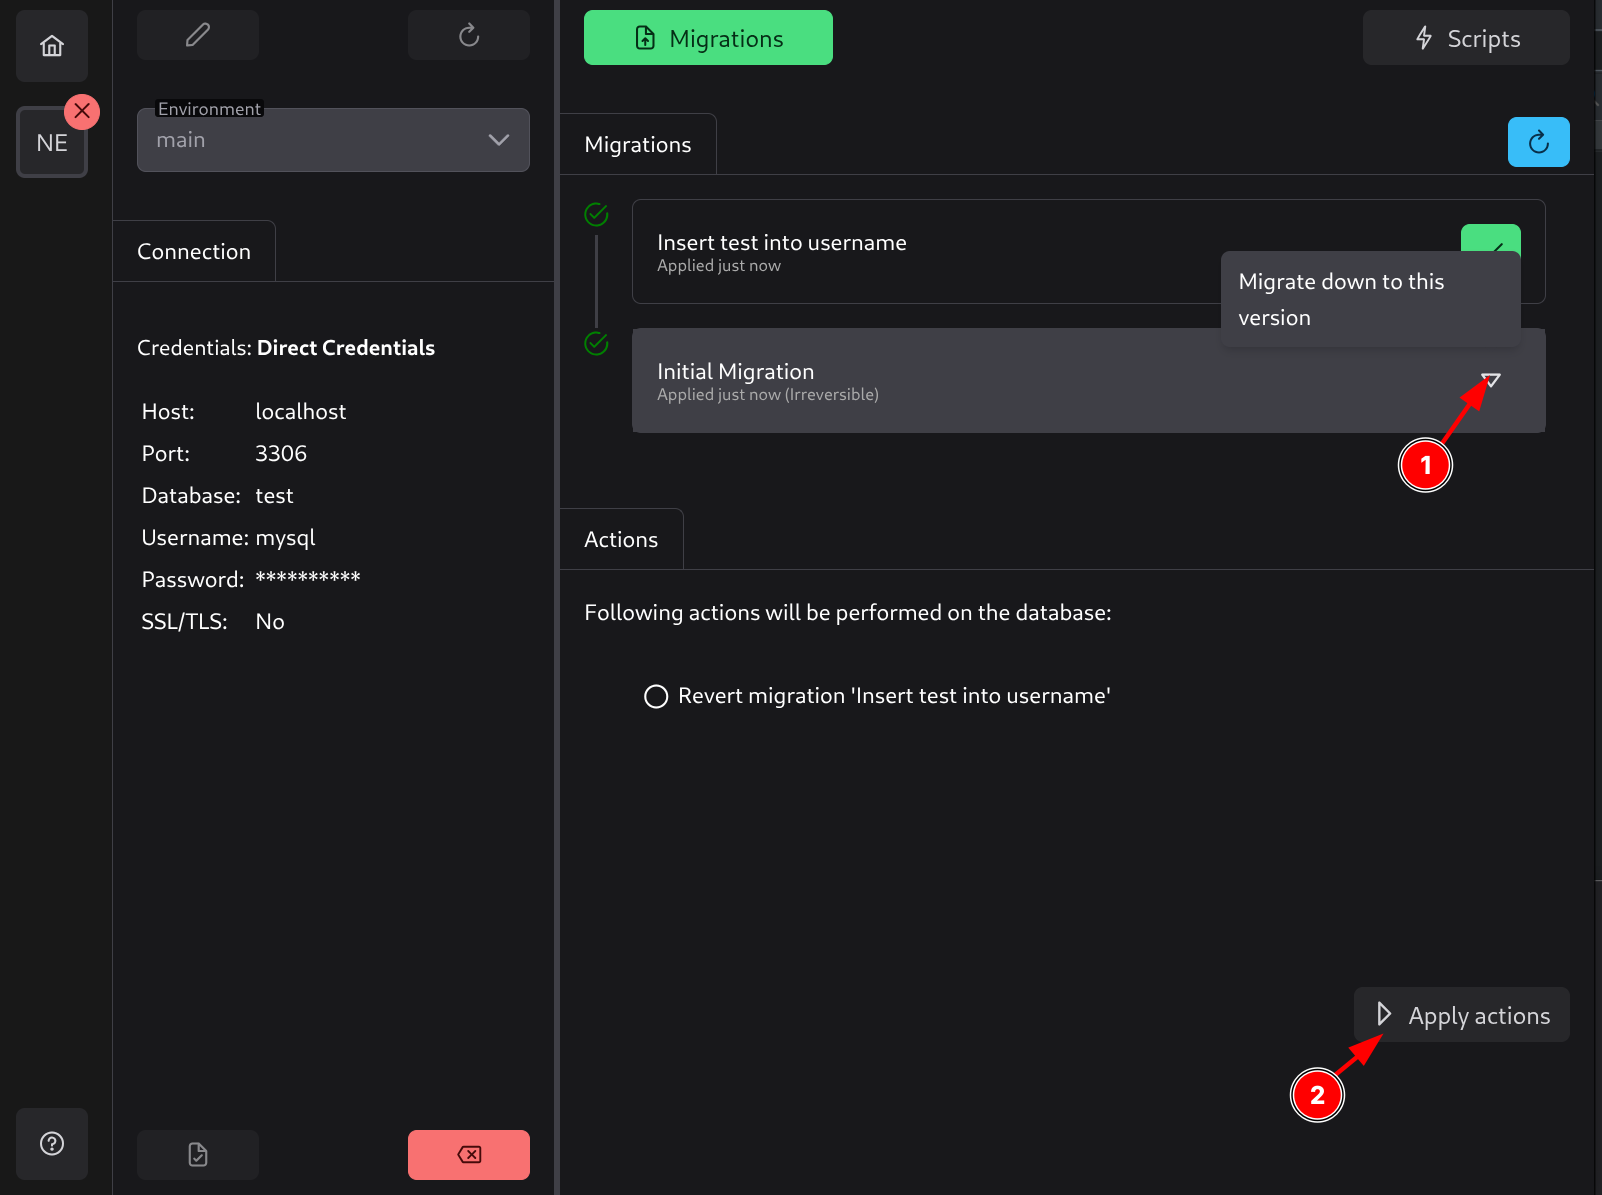
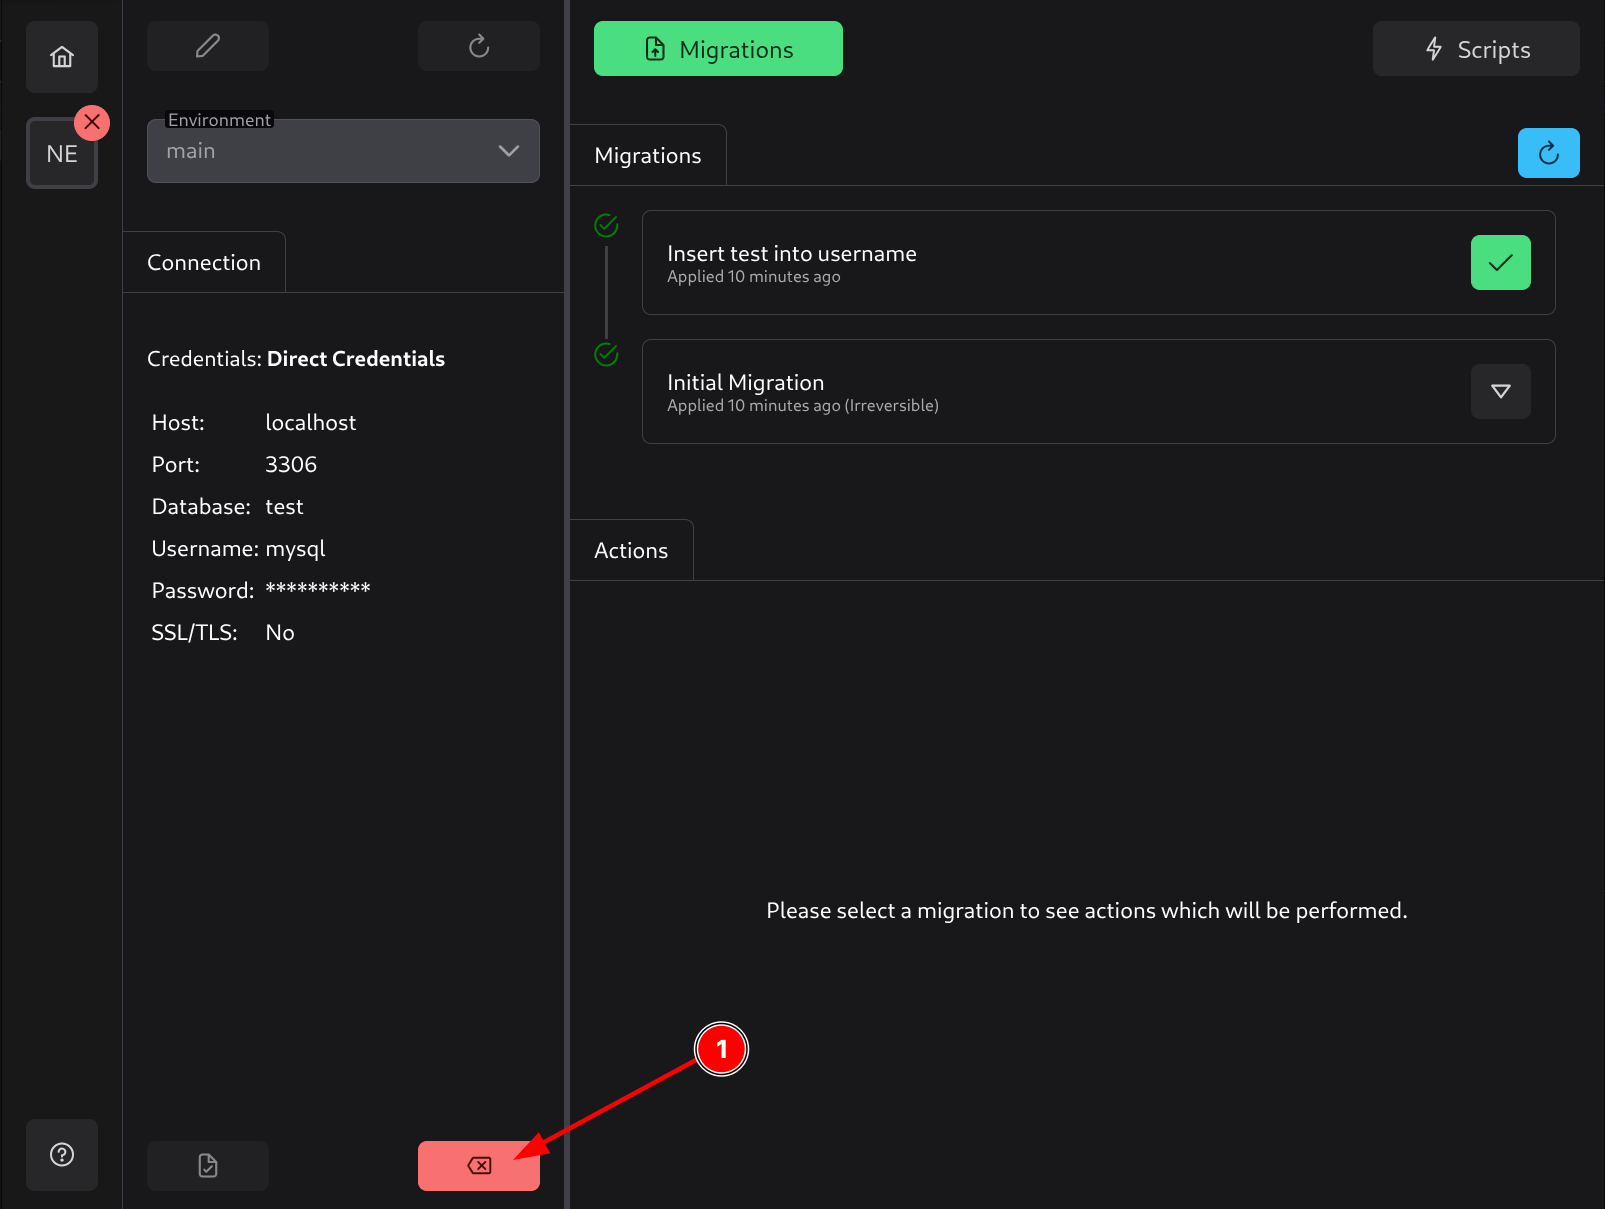
After applying migrations, they will show a green checkmark indicating they have been applied. To revert a migration, you need to select a migration before the applied migration, as shown in the image (1).
If a migration is irreversible (as is the case with the Initial migration), this means you cannot revert past this migration as it does not have any down migration logic, meaning it cannot be safely reverted.
To finish reverting the migrations, click Apply Actions (2).
Running Scripts

Scripts can be run by switching to Scripts mode (1) and picking a script.
After a script is chosen (2), its code will be shown below with dynamic replacements applied for this environment so you can confirm it before running.
To run the script, click the Run Script button (3).
Deploying a Project
All projects in SQL Migration Tool can be managed directly by the desktop application, or they can be integrated into your CI/CD pipeline to run on deployment.
Every project created by SQL Migration Tool includes a package.json file with a setup to install the 2am-smt Node.js module for your project to facilitate deployment.
You can install 2am-smt globally and use it from NPM, or you can use it locally per project to avoid version conflicts.
This guide will explain the local version.
To run the deployment, Node.js is required. Prefer LTS (Long Term Support) versions as they have the most stable code.
Your project’s README records the version of Node.js it was created with. While the specific version of Node.js doesn’t matter much (any version that can run 2am-smt will work), it is good practice to use that version, though not required.
The following commands should be added to your CI/CD pipeline to be run from the project’s root:
npm install
npm run migrate <env>
Replace <env> with your environment of choice. This must be the name specified in the configuration.yml file of the project.
The command npm install will install Node.js modules and 2am-smt for this project.
The command npm run migrate <env> is (by default) equivalent to 2am-smt migrate:to -a <env>, which means it will apply all migrations (without prompting for confirmation) for the defined <env>.
All commands specified by npm run are defined in the project’s package.json file in the scripts key.